
Let’s face it, the real reason I want a visa is to pose in front of Manhattan
At the moment I started writing this post, I was sitting in my parent’s house somewhere in northern India, waiting for my passport to come back from the US Embassy in New Delhi. If things went well, it would contain a renewed H1B visa which would allow me to head back to New York City (the place I like to call home). While much maligned in American public discourse by both sides of the political divide, no one really seems to understand how the visa actually works, or have any idea about how difficult it is to get. Not to mention any idea about how it affects the lifestyle of people who do manage to get it.
But fear not, my American friends. Today, right here, you are about to get an introduction to the H1B visa from an immigrant who has had the pleasure(?) of receiving it. If you manage to emerge with your sanity from under the pile of laws and regulation I’m about to throw at you, then you’re either an immigration lawyer or you didn’t actually read this post, or you might actually be the right person to affect some change. Alrighty, let’s get started!
What the f*** is a visa?
Ah right, you’re American. Chances are you don’t really know what an actual visa looks like. Wait, what’s that you said? You’ve been to Europe and they put a visa in your passport at the airport? Yeah, that’s just an arrival stamp. Wait, you’ve been to Canada and Mexico as well? Nope, still just an arrival stamp. Woah, woah, woah. You’ve been to China and Brazil? Look at you, globetrotter. In that case, you have seen a real visa and you may safely skip to the next section.
For the ones who are still here, Americans can go to 186 countries with no visa / visa on arrival. That means that for most countries in the world, you can show up at the airport and you’ll be let in. That’s a lot of freedom of movement. An Indian passport holder for example, gets access to only 59 countries without a visa. That means that as an Indian citizen, you can’t just decide to go to Paris for the weekend. You’ll have to decide weeks in advance, and then make a trip to the nearest French Consulate (which might be in another city), and submit your passport with a pile of documents proving that:
- You have money to spend in France.
- You have a place to stay.
- You won’t create any trouble in France.
- You will definitely leave after your stay. I’m sure you’re a nice person, but they’d rather you leave after spending your money.
If the French deem you worthy, you will be granted what is known as a Schengen visa. This is what it looks like:

Not my photo. Credit: The Internet
With this, you can finally visit Paris, and even go to other European countries that are included in the Schengen Area. Notice that the UK isn’t in it. No, they didn’t Brexit from the Schengen agreement. They just never Brought themselves into it in the first place. What that means is that you, Indian citizen, cannot simply pop over across the channel to London. You’ll need a UK visa for that, and this is the sort of madness you are in for. You poor soul. On the other hand, you, American citizen, can easily head over to London for a quick shopping trip during your weekend in Paris. You lucky fuck.
Alright, I think we all understand what a visa is. Yes? Good.
The H1B visa and how to get it
Here is what an H1B visa looks like:
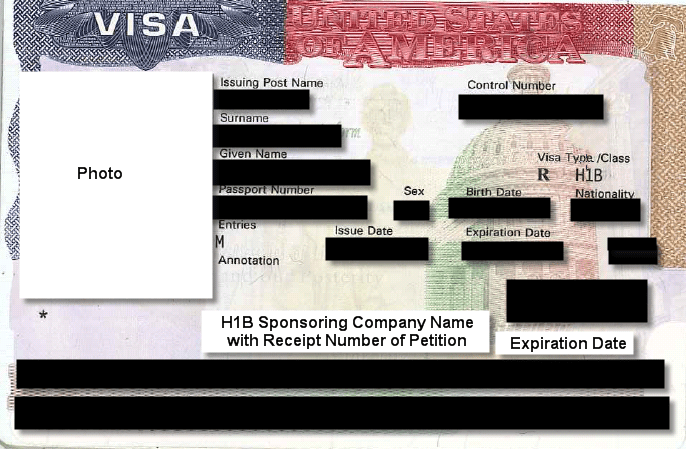
Credit: The Internet
The H1B is technically a work visa. Notice that it contains the name of the company you work for. This means that if you change jobs, you will need an updated visa which usually means a visit to the US consulate any time you leave the US after changing jobs. If you’re thinking, “well, that sounds like a pain in the ass”, you’re damned well right it is! I’ll get into this more later. Let’s first start from the beginning.
You’re a bright young non-American who has just been offered a killer job at your dream American company. There are of course, multiple types of visa that would allow you to come to the US (depending on your skill set and type of job), but let’s say you are a highly-skilled college graduate in a science/technology field. Most likely, you’ll need an H1B visa, which is designed for “highly skilled workers”. The US government only grants 85,000 H1B visas each year, out of which 20,000 are reserved for people who hold at least a Masters degree. In 2018, however, the US government received 190,000 applications. That’s more than twice the number of visas they will grant. In fact, the number of applications was even higher in the years before.
So how do they decide who gets in and who doesn’t? They organize a lottery on April 1st every year. That’s right – all 190,000 of these people had to submit their application on April 1st 2018. A day later than April 1st, and you’re screwed until next year. To make things even more interesting, you yourself can’t put your name in the lottery. The company that offered you a job will have to do it for you. Let’s assume that you got the job offer around December of your senior year. Since your company is going to have to file your H1B petition on April 1st, they will need to prepare in advance to have all the papers ready. Here’s a non-exhaustive list of things they’ll need to do:
- Fill out an H1B petition (also known as Form I-129). Depending on your circumstances, this could be several tens of pages long.
- Prove that you meet the government’s definition of “highly skilled”.
- Prove that by hiring you they aren’t displacing an equally qualified American worker.
- Fees for the petition.
- More money if they want it to be processed faster IF you clear the lottery.
Alright, it’s April 1st. You’re about to graduate from college and are super optimistic about your future (lol). The company submits your documents and you begin an agonizing wait where you pray to your favorite god of your favorite religion that you get picked by the random number picker algorithm running on some shitty computer in a USCIS office. In the meantime, you try to prepare back up job offers in case you don’t get selected for the lottery. Over the next few weeks, you might receive an acceptance or a rejection based on the effectiveness of your prayers. Let’s say that you got lucky and made it past the lottery.
Now begins the fun part. AFTER making it past the lottery, USCIS will start actually reviewing your entire application to decide whether to approve your petition or not. This could take anywhere from 3 weeks to 3 months, based on whether your company paid more for premium processing or not. Let’s say that things worked out and your petition is approved.
Pop the champagne, and start appreciating the fine sport of Baseball. You’re going to America! Fuck yeah!
Of course, the rules state that you cannot actually go the US without a literal visa in your passport. You don’t really have that yet. In reality, you’ve only made it past stage one of the process. Now comes stage two. The approval of your H1B petition is sent to you by your company. It’s called a “Form I-797A” which will grant you the ability to work in the US for a period of 3 years. Even if you get this form, USCIS does not allow you to actually start working in the US before October 1st. Why? ¯\_(ツ)_/¯
Your company has done its job, and it’s time for you to do some work. You’ll take the I-797A, and go to the website of your local US embassy/consulate. There, you will have to fill out another multiple page form called the DS-160. This form will ask you (among other things):
- Every place you’ve traveled to in the last 5 years.
- The exact dates of your 5 previous visit to the US, and length of stay in each instance. If you don’t remember the exact dates like most normal people, well, screw you. I personally have a text file where I keep a list of every single date where I’ve entered and exited the US, where I went, and for how long.
- A 5-page yes/no questionnaire where you get to answer fun questions like “Do you seek to engage in terrorist activities while in the United States or have you ever engaged in terrorist activities?”, and “Have you ever ordered, incited, committed, assisted, or otherwise participated in genocide?”. I’m not making this up – these are actual questions on the form.
Once you’ve filled this form out and submitted it online, you will be asked to schedule an in-person interview at your nearest US embassy/consulate. Depending on where you live, there might not be any available appointment in the next few weeks, or even anywhere close by. Let’s say you get an appointment date and make it over to wherever the US embassy/consulate is. You have to take with you a proof of DS-160 submission, and the I-797A you received from your company. You will be interviewed by an official who will ask about your intentions in the US – Where will you work? Where will you stay? What kind of work will you do? Etc.
At this point, three things can happen:
- You said something bad, or something in your profile was not right and your visa is denied. Yes, this is possible even with an I-797A approval in your hand.
- Something in the official’s computer said something to them and they decided to put you in “administrative processing”.
- You actually get approved for a visa and they take your passport.
If the first outcome befalls you, well, too bad my friend. You almost made it.
It it’s the second one, they will hand you a pink colored paper called a Form 221G, which basically says that they need to do some “administrative processing” and get a “security clearance” before you can get a visa. This process can take anywhere from 3 weeks to over 3 months. In all this time, you pretty much have to sit, wait, and pray to your favorite god of your favorite religion. If things go well, they will finish their stuff faster and grant you an actual visa.
If you get lucky enough to end up with outcome #3, they will take your passport right after the interview and return it within a few days with the visa in it.
From the initial I-129 filing, to the I-797A approval, to the DS-160, the interview, the possible 221G, and finally an actual H1B visa, this process can take multiple months. Of course, there is very little guarantee that you will actually get to the end.
Still with me?
Good!
Notice that the visa is actually valid for 3 years. After that, you can renew it. At that point, you will repeat THE ENTIRE process above EXCEPT for the lottery. Yes, your company will file an I-129 and you will get an I-797A. You can continue working with an I-797A if you’re already in the US before your old H1B visa expired, but if you leave at any point after that (to say, go visit your home country), then you’ll be stuck there until you fill out a DS-160, go in for an interview to the US embassy there, and get a renewed H1B visa stamped in your passport. Of course, if they hand you a 221G on this trip, you’ll be stuck outside the US for an unknown amount of time that could range up to multiple months.
At any point, if you change jobs, or companies, you will (again) repeat THE ENTIRE process above EXCEPT for the lottery.
Getting an H1B is a major pain the butt. I’ve actually left out some intricacies in this post to keep it relatively simple. Things can get significantly more complicated than noted here.
How companies could abuse the H1B
At this point (if you’ve made it this far), I hope you appreciate how difficult the process already is. As a foreigner, you can’t just waltz your way into the US with an H1B in your hand. It takes a lot of work and persistence to make it through this process, and to do it every 3 years, and every time you change jobs.
That doesn’t mean, however, that this process is free of abuse. Notice above that I talked about how a company needs to prove that you meet the government’s definition of “highly skilled”, and that by hiring you they aren’t displacing an equally qualified American worker. This is where things get shady. Some companies act as “staffing/outsourcing” agencies where they bring in foreign workers on H1B visas, ostensibly paying them much less than equally qualified American workers. Accusations of this kind are often laid out against outsourcing firms in India. This is the sort of stuff that politicians love to talk about when they make campaign promises. The H1B visa process is incredibly intricate and bureaucratic, but it still doesn’t do enough to meet the needs to American companies while preventing abuse by bad actors. The process needs lots of simplification, but at the same time, it needs a lot more tightening up so that it lives up to its original purpose. It needs to spin a lot of plates, but sadly, no one has figured out how to do that yet.
You might ask – well, what should we do about this then? Maybe you could put a salary minimum on H1B visa workers and keep the minimum high enough to discourage foreign hires that undercut American workers. Perhaps you could create a different type of visa for outsourcing/staffing jobs and make different rules for it. Perhaps both of these are terrible ideas, and we need something completely different. I don’t know, and being non-American, I can’t really do much about this either way.
My hope, American friends, is that at the very least this post helped create empathy around what a typical H1B visa holder has to go through and why it isn’t quite what you might have thought it was like. Perhaps with this new knowledge, you can help affect change in a way that benefits everyone. I hope and pray to my favorite god of my favorite religion _/\_.